

How To Make Background Warm In Lightroom

How to Become Beautiful Peel Tones in Lightroom (Every Time!)
Beautiful skin tones are something we ALL want to attain in our images. They are essential when shooting portraits and weddings!
In Lightroom, perfect skin tones are achievable but definitely take some know-how and exercise. By following the steps below, you can have picture-perfect pare in every photo y'all shoot speedily and easily!
Permit's get started:

Stride 1. Check the Skin Color Residue
You lot tin can't fix something if you don't know what needs to be fixed. By checking the color residuum, yous tin can see what the particular needs of the image are and so take steps to correct them.
To check the color remainder of your skin tones in Lightroom, go to the Develop Module and hover your mouse over a medium-tone area of your subject field's skin. RGB number values volition announced in your histogram area on the right. These RGB values will help you analyze your peel tones.
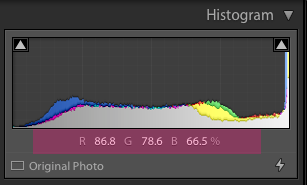
RGB Dominion of Thumb for Beautiful Skin Tones:
- The bluish % value should be the everyman value.
- The green % value should be college than the blue value past at least i percentage point.
- The scarlet % value should be the highest value and at least two percent points over the green.
At present that you know the RGB values of your skin tones and the optimum values, you volition know what color needs to exist corrected on your particular prototype! We'll do that in the side by side few steps.
Annotation: One question you might be asking is why the RGB values are higher in some images and lower in others? Answer: The higher the per centum values, the brighter the peel tones are. The lower the percentage values, the darker the skin tones are.
Let's make these adjustments to the following paradigm:

Step 2. Adapt the Exposure and White Remainder
If your prototype or skin tones need an exposure or white balance correction, it is essential to have care of that before making changes to the skin tone color values.
An easy style to adjust the image exposure is to use the Exposure slider in Lightroom's Basic Panel. Yous may also want to accommodate the Highlights and Shadow sliders since those can as well touch the exposure of your image.

To adjust White Residual, click the White Residue Dropper in the upper-left of the Bones Panel. Then hover over and click on amedium-grayness tone in your image - good options for this are the whites of the optics or whatever element of your image that is gray (i.east. cement, wear, etc.)
Yous can also adjust the Temperature and Tint sliders. Even so, this will require you to visualize what colors in your white remainder demand adjusting.
Ask yourself: Should the image be warmer or cooler? Is the image likewise cherry or greenish?
Moving any of these sliders to the correct will cause whichever value you lot are adjusting to burnish or increase. For example, if you are moving the Exposure slider to the right, the overall exposure of your image will brighten (increase). If you are moving the Shadows slider to the correct, the shadow areas of your image will brighten.
Here is a before and after of our epitome with only white residue and exposure adjustments:

Step 3. Adjust Skin Tones Using the Tone Curve Console (Option 1)
Apace bank check your skin tone values 1 more fourth dimension to make up one's mind which color value needs to be increased or decreased. Then open the Tone Bend Panel. You will see a tone bend appear. This panel seems less straightforward to many, but information technology is POWERFUL when it comes to skin tones!

At the height of the Tone Bend Console, click on the circumvolve of whichever color yous feel needs to exist adjusted.
Is your blue value too high? Click on the blue circle to open the curve. Click on the Targeted Adjustment Tool to activate it. Motion over to the peel tones in your image and and then click and drag Downwardly to decrease the corporeality of blue showing in your image'southward skin tones.
You will probably only demand to make minor adjustments, so don't overdo how much you elevate downward (or upward).

You may need to adjust more than i curve. For instance, after decreasing the blue in the skin tones using the bluish curve, you may too need to increment the warmth a bit using the red curve. And If your photo includes a lot of green trees or grass, you may demand to make some adjustments to the green channel as well.
I find that I employ the red and blueish curves the most.
Stride iii. Adjust Skin Tones Using Luminance & Saturation (Option 2)
Another option for adjusting your pare tones is to use the Luminance department of the HSL Panel (HSL = Hue Saturation Luminance). The Luminance sliders adjust the brightness or darkness of colors in Lightroom.
To correct skin tones this fashion, select the targeted aligning tool in this console and click and drag Upward over the skin tones to brighten those tones. More specifically, click and elevate upwards over areas where you notice troubling tones.

If a specific tone in your image is troubling you, switch to the Saturation department of the HSL panel, apply the same Targeted Adjustment tool, and click and drag downward over an area with that tone in it. This volition subtract the saturation of that tone.
Of course, y'all tin can too manually conform these sliders, merely I think you will appreciate how PRECISE the Targeted Aligning tool is.
Pace 4. Clone and Heal
Cloning and healing is an essential pace toward achieving beautiful skin. During this step, you should clone out any blemishes and night spots. If your subject has more mature skin (older), yous may even clone out a few wrinkles and suit the opacity of the clone tool to help it look natural.

Tips for using the Clone/Heal tool:
- Set the size then that the smaller inner circle of the brush is just slightly larger than the blemish to be removed.
- For minor skin blemishes, by and large, the Heal tool is the best selection.
- For larger peel blemishes or blemishes close to the edge of the face, it may be best to utilise the Clone tool.
Retrieve that the goal is a natural and beautiful skin tone. So don't go overboard and over-edit every wrinkle and pore on your subject's confront.

Stride five. Utilise Portrait Brushes & Lightroom Presets
Why non brand your life easier and save A LOT of time editing?
The portrait brushes in Pretty Presets Perfect Portrait: Retouch and Makeup Brushes, besides as the portrait brushes included in the Clean Edit Portrait Workflow, are both beautiful options for creating perfect, creamy pare tones.
In addition, both collections listed above include brushes for smoothing peel, whitening eyes and teeth, adding clarity, reducing color casts, and much more!
Here is a earlier and later on using the skin smoothing, eye whitening, eye color, and clarity brushes mentioned above:

This is also the time to utilise your favorite Pretty Presets to give your portraits your signature look and feel. In one case you've added your preset, you may need to brand some slight slider adjustments to achieve the perfect look.
When you finish your edit, you tin can take advantage of one of Lightroom's virtually important features to SYNC the edits to all images in a sequence with similar light and white remainder.Important Note: Brush edits should not be synced to other photos - those edits are very image specific and should only be applied to images individually.
The last earlier and after (shown beneath) includes the brush edits mentioned above and the PASTEL Color PRESET from the Clean Edit Portrait Workflow. Gorgeous!

If you are more of a visual learner, spotter our Lightroom Pare Tone Video Tutorial below to see these steps in action:
Video: How to Get Beautiful Pare Tones in Lightroom
Additional Reading: How to Edit Darker Skin Tones in Lightroom
Do you take any questions or comments about How to Correct Lightroom Skin Tones? Get out us a comment beneath - Nosotros would Beloved to hear from you! AndPlease SHARE this post using the social sharing buttons (we really capeesh it)!


How To Make Background Warm In Lightroom,
Source: https://www.lightroompresets.com/blogs/pretty-presets-blog/14660945-how-to-correct-skin-tones-in-lightroom
Posted by: warrendanythas.blogspot.com
0 Response to "How To Make Background Warm In Lightroom"
Post a Comment